
Playbook maps
Summoner's Rift maps used by the chapters: ward spots, roam paths and setups drawn on the map image (rift.jpg, Summoner's Rift by Riot Games). Every map is generated by tools/maps/make_maps.py (SVG source next to each JPG; the SVGs reference rift.jpg).
The markers are drawn on the Summoner's Rift map image; positions are approximate. Open https://map.riftkit.net/ to recreate any setup interactively.
Legend
| Symbol | Meaning |
|---|---|
| Yellow circle with an eye | Stealth ward (trinket or support item ward) |
| Pink square with an eye | Control ward |
| Dashed red circle | Sweep / clear this area with  Oracle Lens or a  control ward |
| Dashed red circle with an X | Do not go there (facecheck risk) |
| White or orange arrow | Our path |
| Red arrow | Enemy path |
| Blue arrow | Our team's path |
| White circle with a letter | Spot letter, explained in the table under each map |
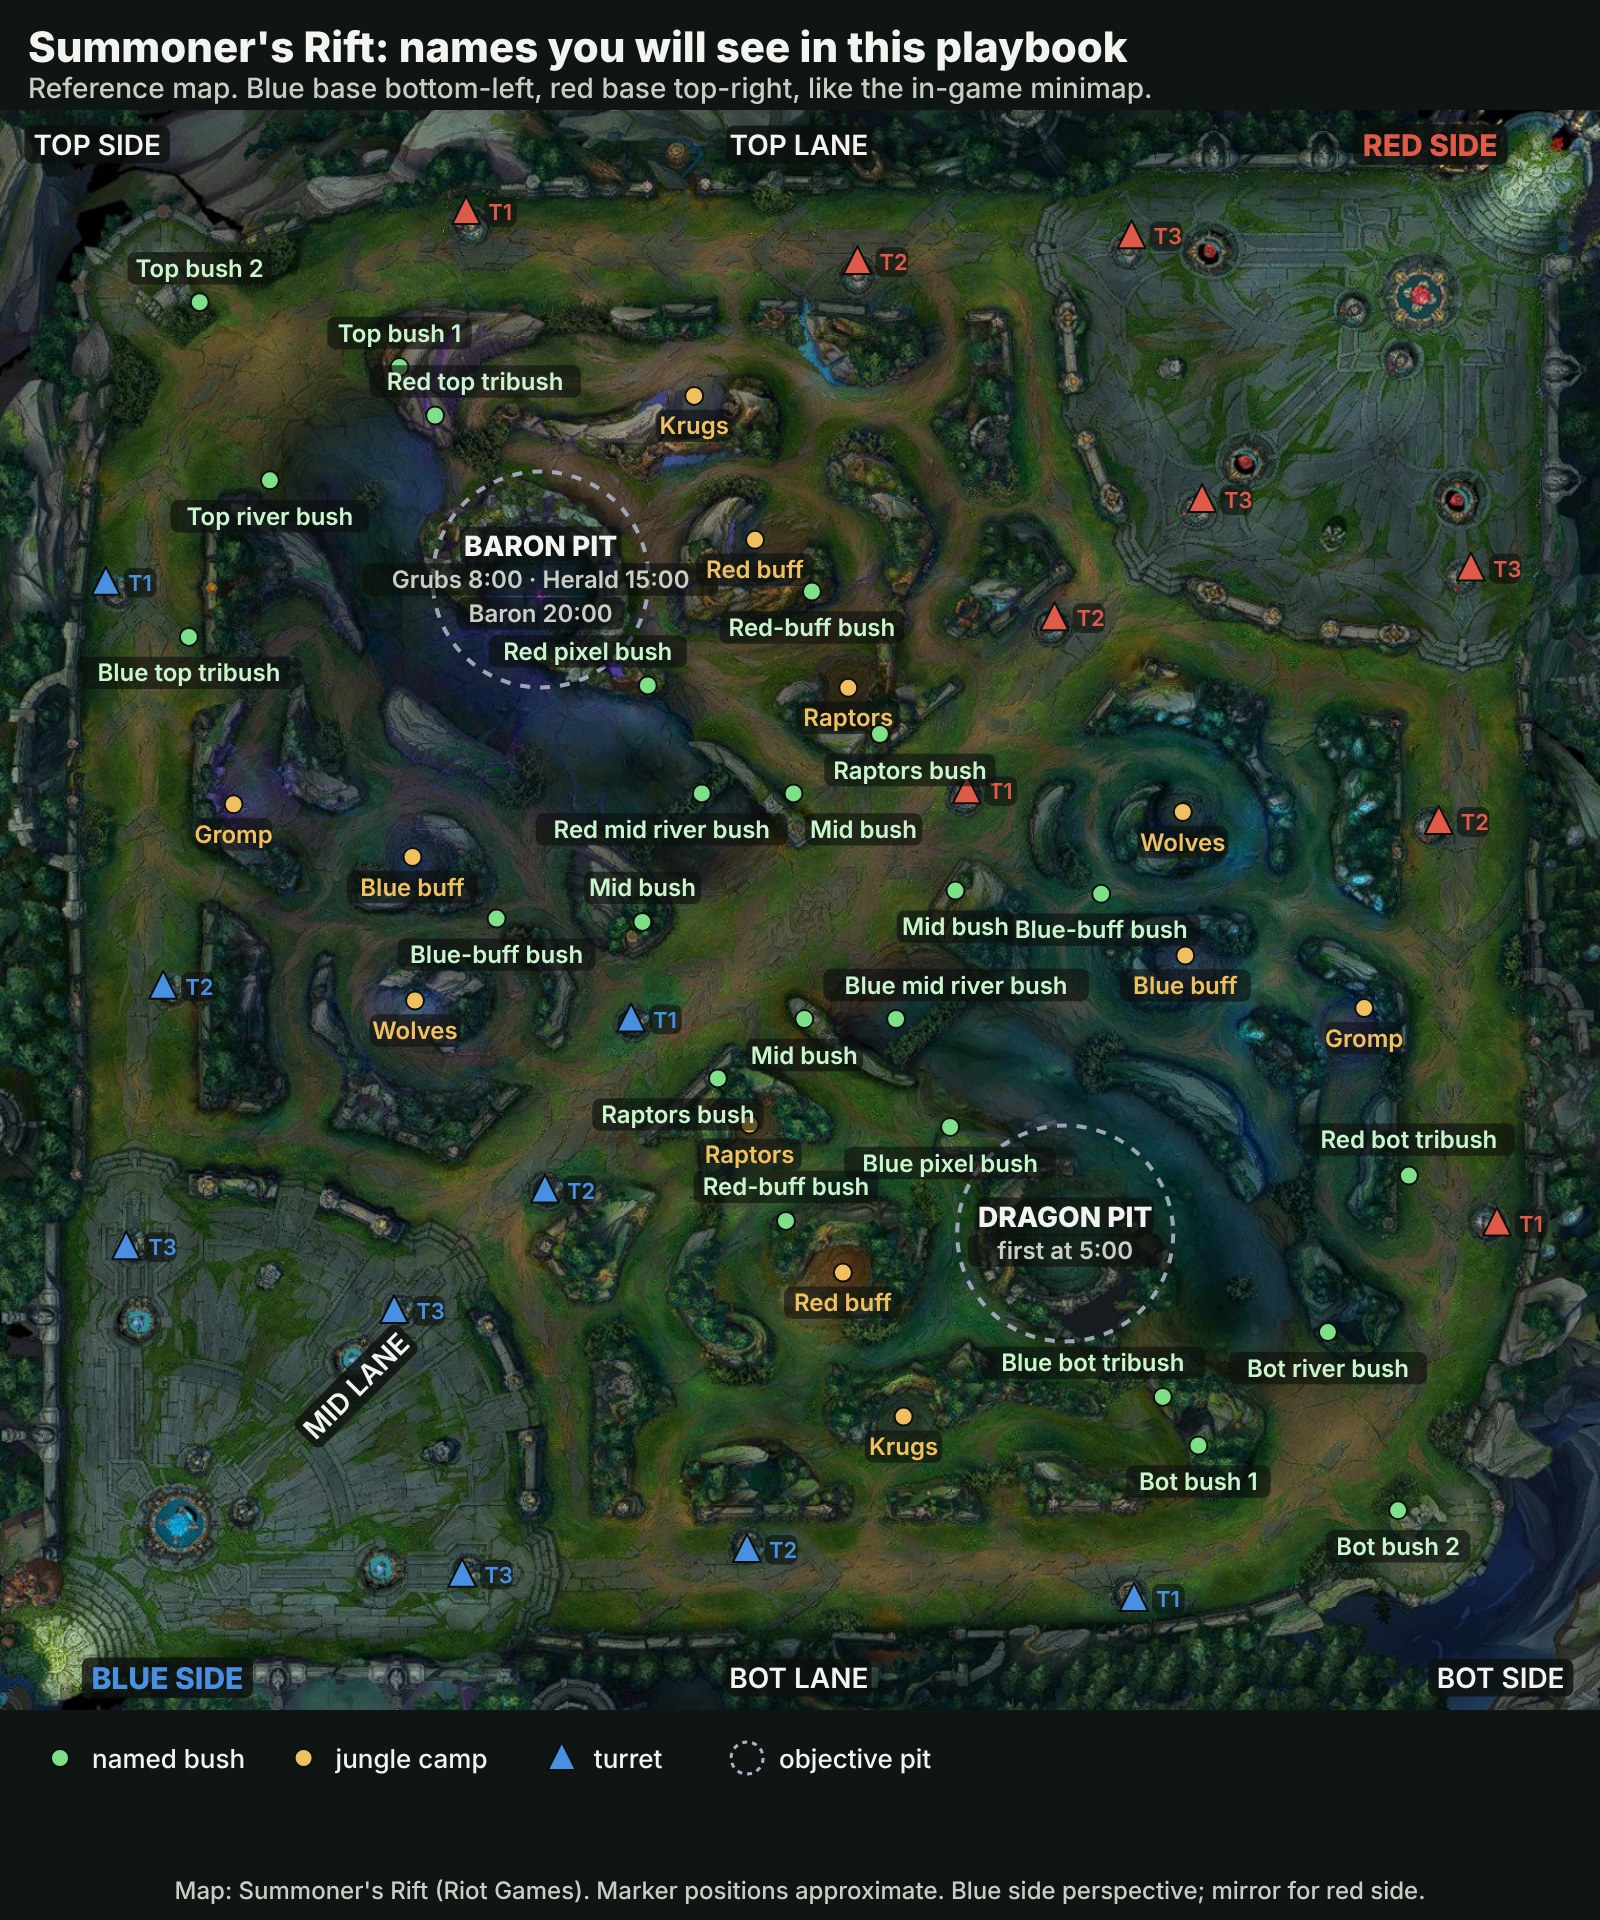
| Green dot (overview map) | A bush named in the playbook |
| Gold dot (overview map) | Jungle camp |
| Triangle (overview map) | Turret, with its tier (T1, T2, T3) |
| Dashed circle (overview map) | Objective pit (Baron / Dragon) |
All maps are drawn from the blue side (base bottom-left). On red side, mirror every spot through the middle of the map.
Ward maps by phase
Pick a phase; the letters on the map match the cards beside it.
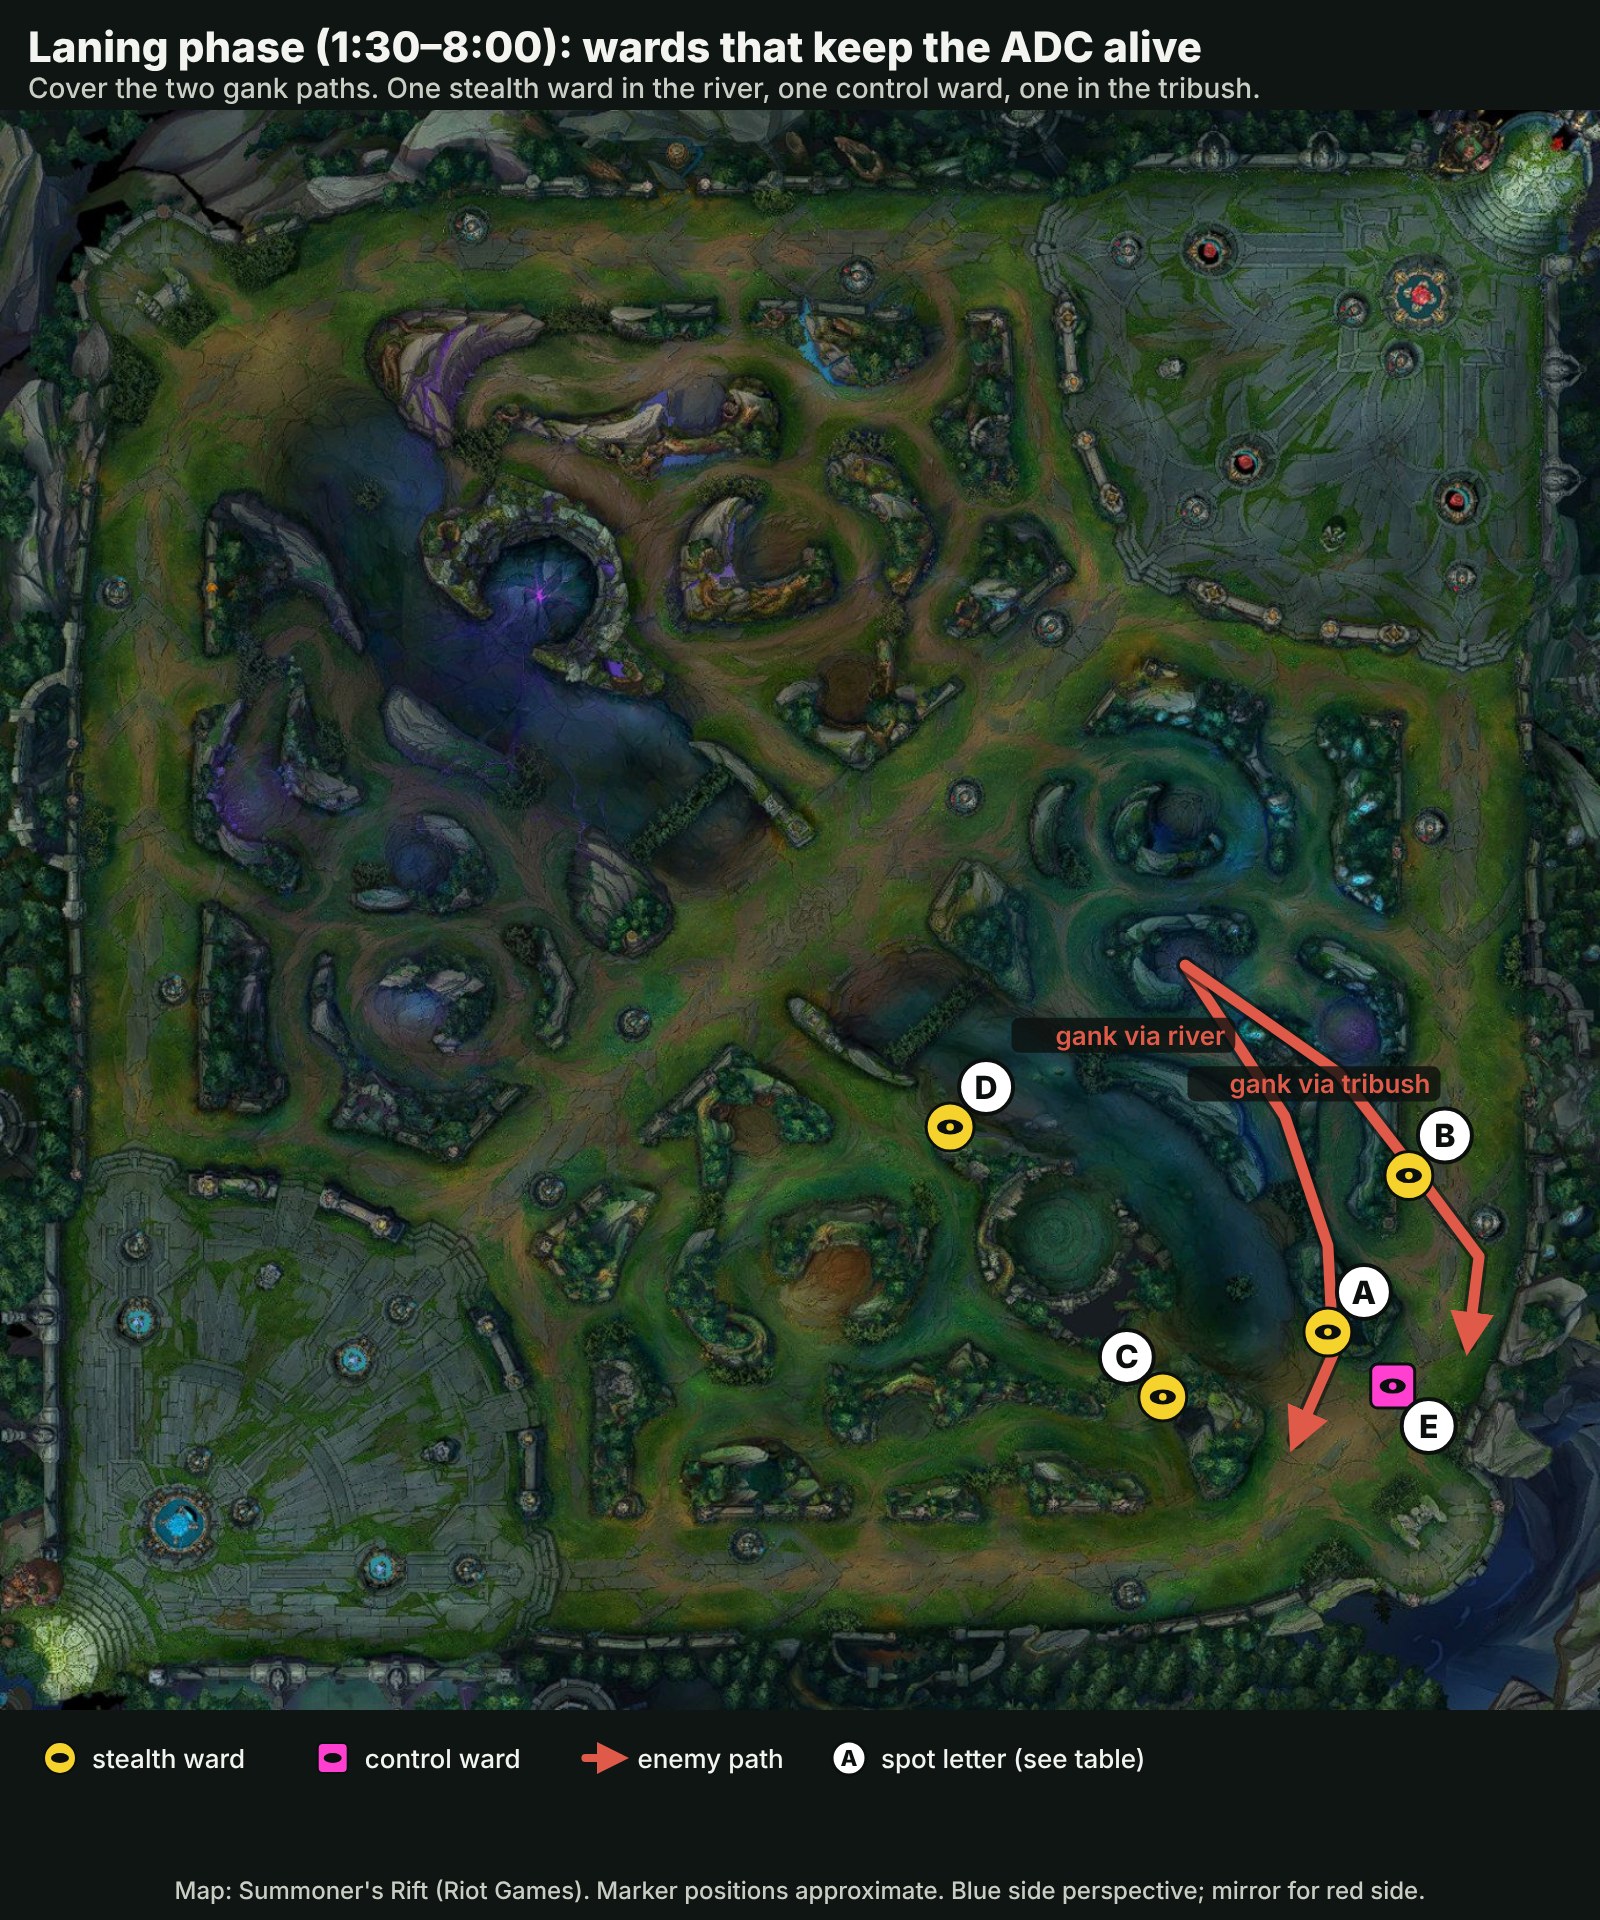
The spots, in order of priorityRebuild it on map.riftkit.net
- ABot river bushThe ward that saves the most lives: sees the jungler coming down the river and the enemy support rotating.Stealth ward
- BRed bot tribushSees the jungler walking out of the enemy blue-buff side toward the lane (the second gank path).Stealth ward
- CBlue bot tribushOur side. Ward it when the enemy jungler has pushed through the river to dive or when you are behind.Stealth ward
- DBlue pixel bushSees the enemy mid laner or jungler crossing the river toward bot. Place it when you walk back from a reset or when you have lane priority.Stealth ward
- EControl ward (bot river mouth / near the river bush)Denies the enemy support's ward in the river and keeps your river ward alive. Buy one on every base.Control ward
- Stealth ward
- Control ward
- Sweep this area
- Do not go there
- Our path
- Enemy path
All maps
rift-overview
vision-level1
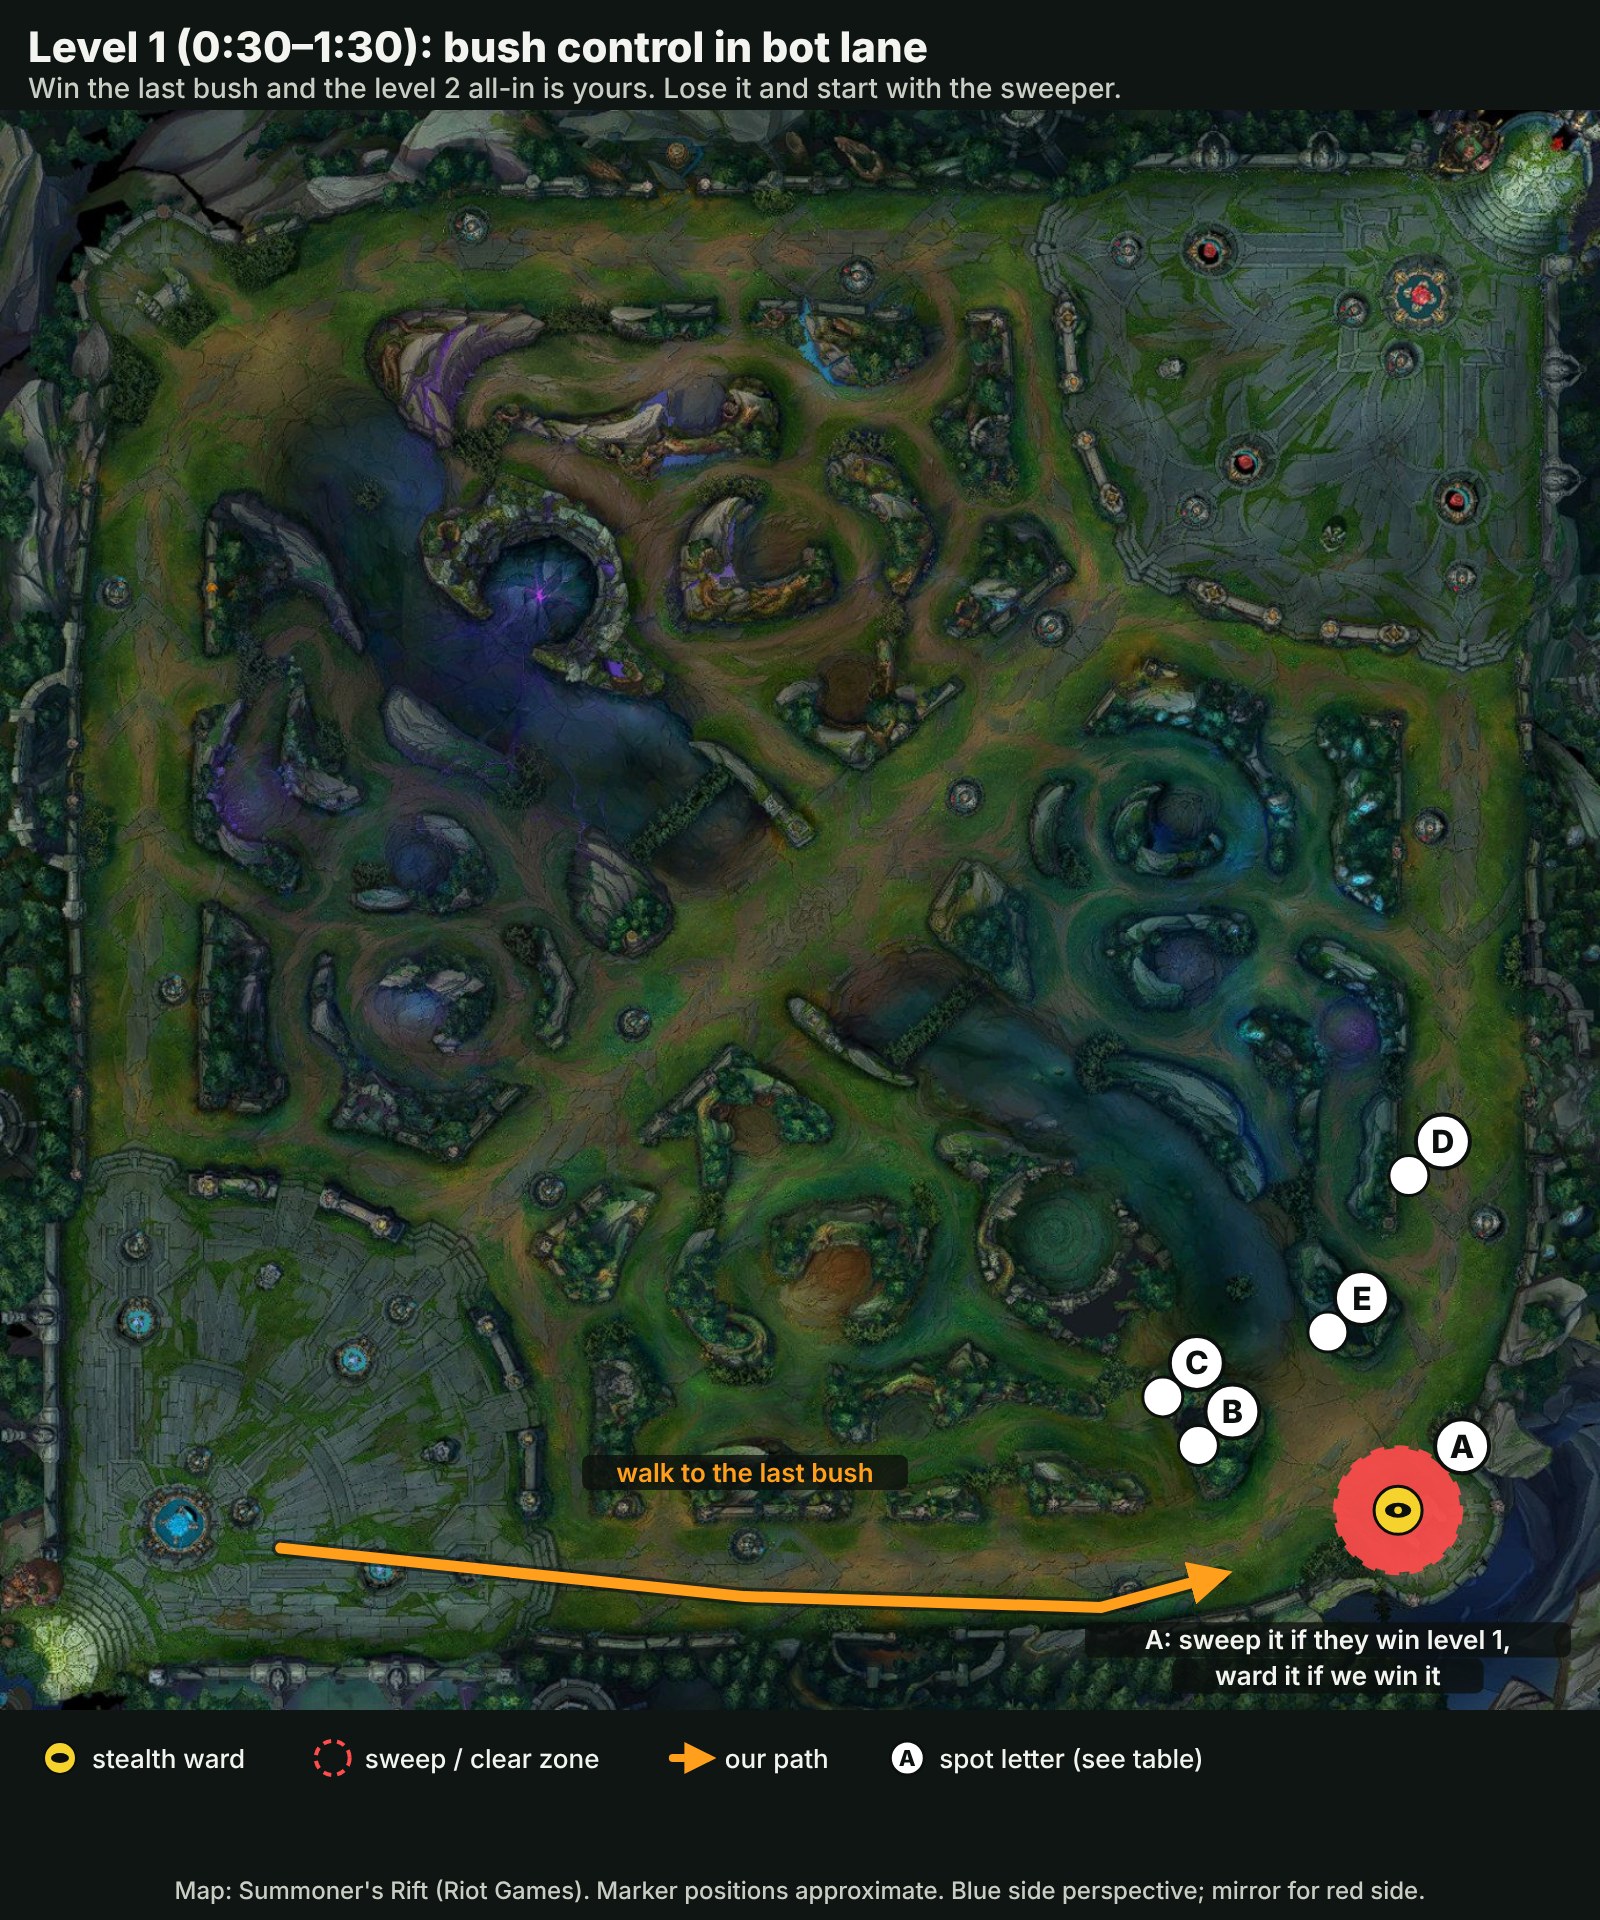
The spots
- ABot lane bush 2 (near red T1), the last bushThe bush closest to the enemy tower. Whoever holds it controls level 2. Ward it when you win level 1, start Sweeper and clear it when you expect to lose the first trade.Stealth ward
- BBot lane bush 1 (near blue T1)Our safe bush. Fall back here if the enemy wins the last bush; it still hides you from the lane.Spot
- CBlue bot tribushOur jungle entrance to the lane. Ward it when the enemy jungler starts bot side, so the ADC sees the gank path.Spot
- DRed bot tribushEnemy jungle entrance. A ward here later shows the enemy jungler leaving their blue buff toward the lane.Spot
- EBot river bushRiver entrance to the lane. Most early ganks come through here.Spot
vision-laning-phase
The spots
- ABot river bushThe ward that saves the most lives: sees the jungler coming down the river and the enemy support rotating.Stealth ward
- BRed bot tribushSees the jungler walking out of the enemy blue-buff side toward the lane (the second gank path).Stealth ward
- CBlue bot tribushOur side. Ward it when the enemy jungler has pushed through the river to dive or when you are behind.Stealth ward
- DBlue pixel bushSees the enemy mid laner or jungler crossing the river toward bot. Place it when you walk back from a reset or when you have lane priority.Stealth ward
- EControl ward (bot river mouth / near the river bush)Denies the enemy support's ward in the river and keeps your river ward alive. Buy one on every base.Control ward
vision-first-dragon
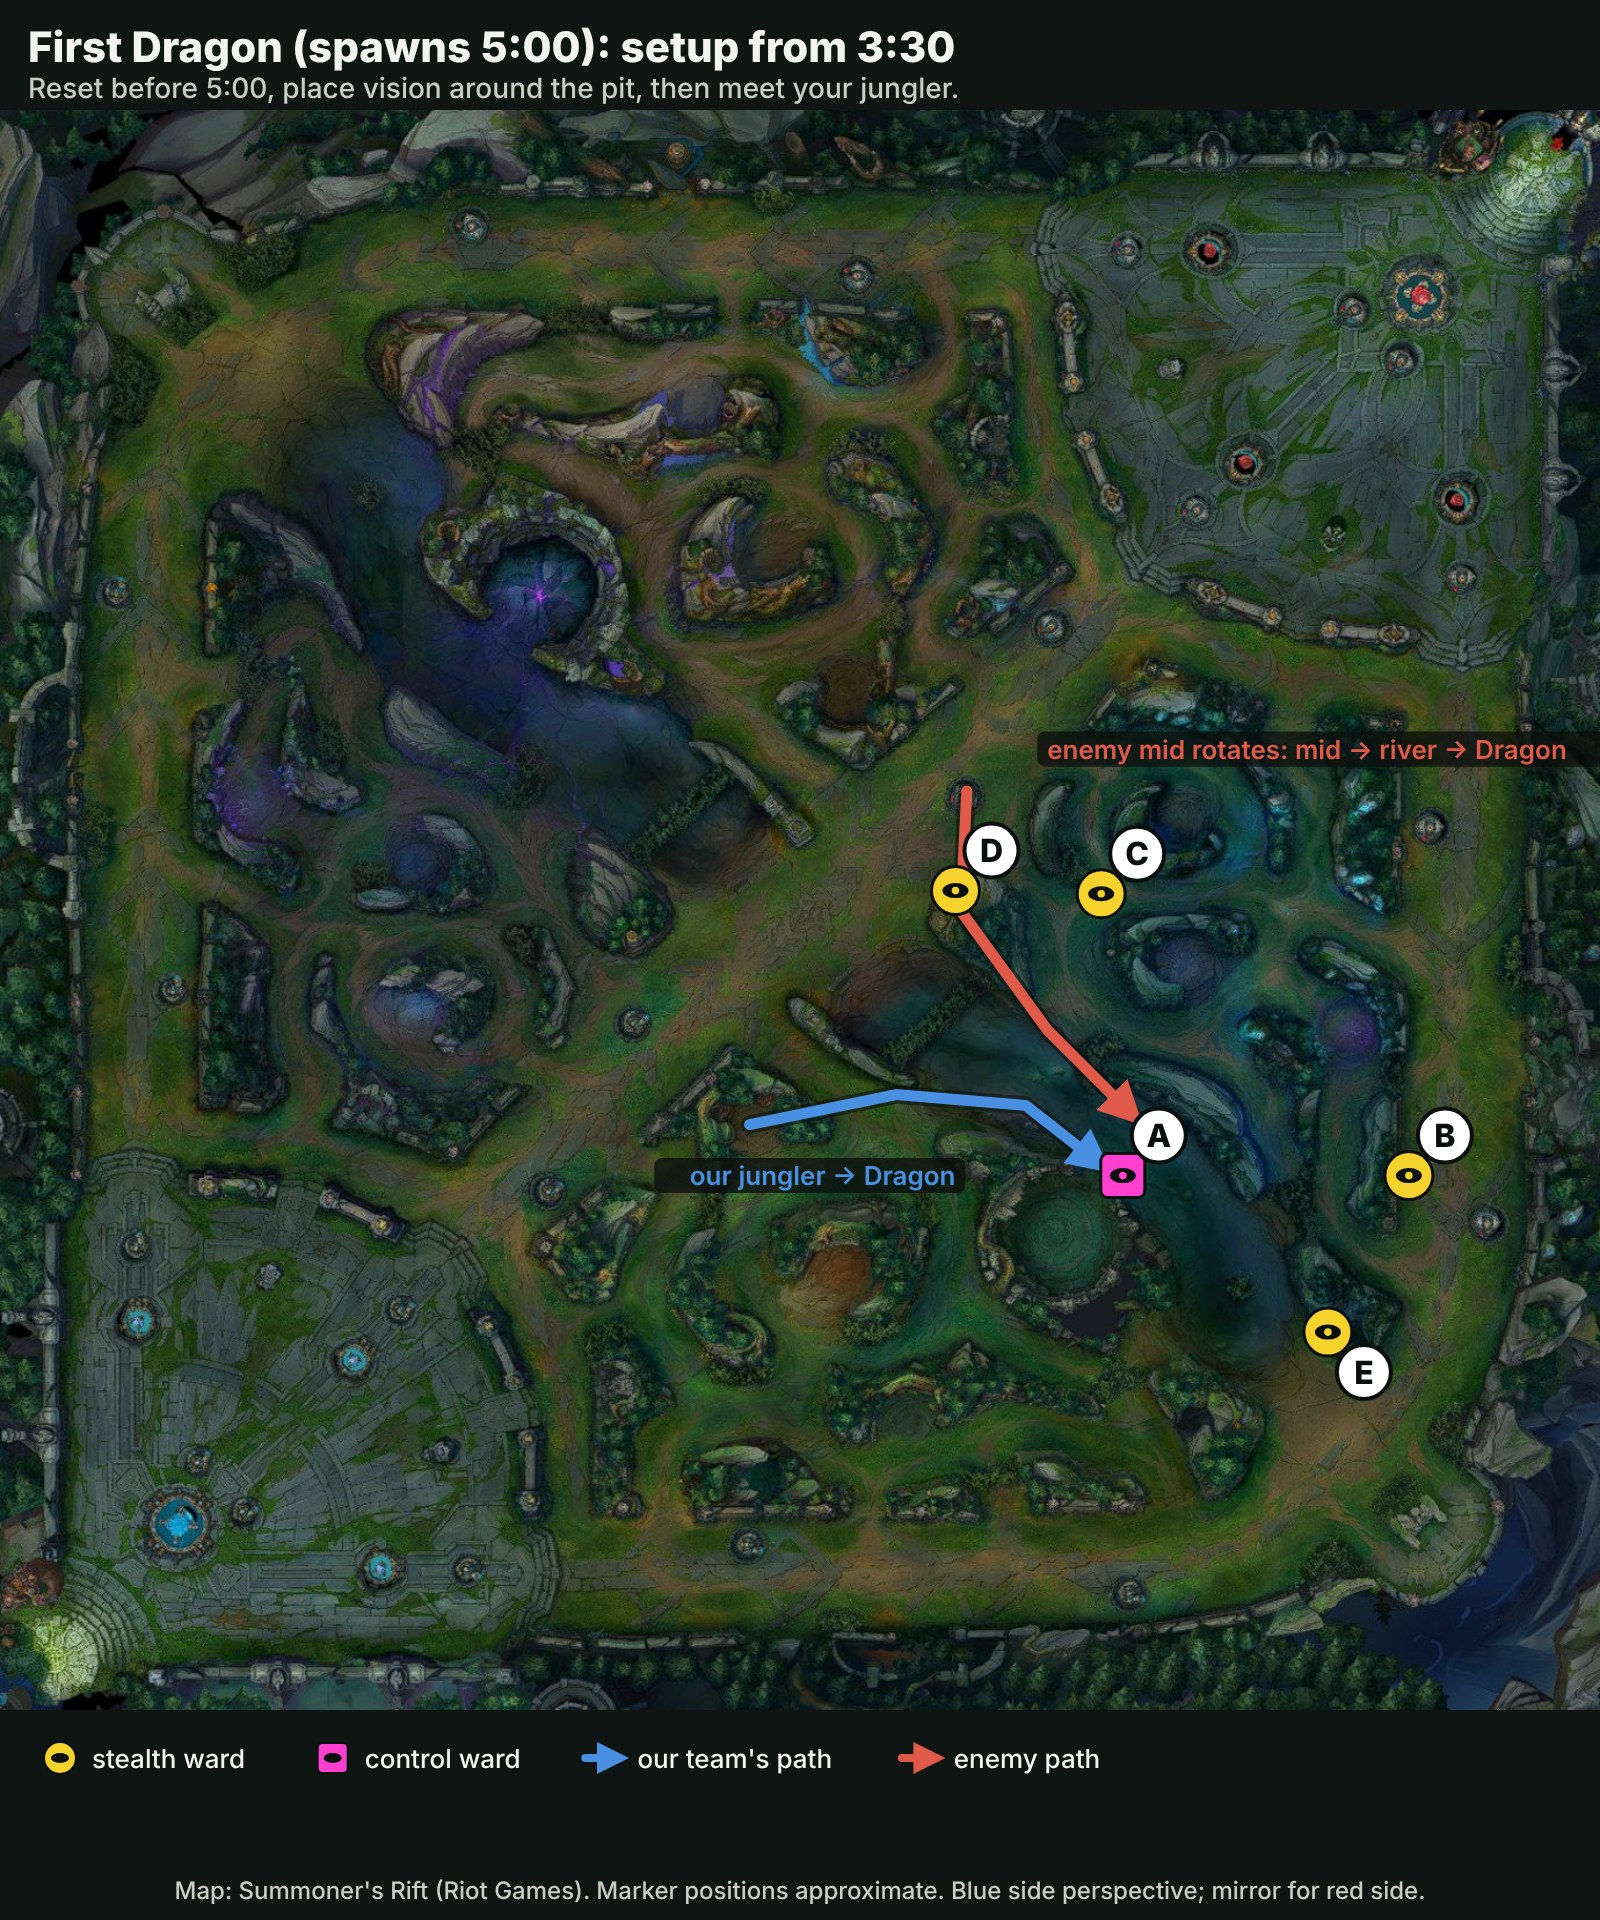
The spots
- ADragon pit (river-side lip), control wardDenies enemy wards in the pit so they cannot time the Dragon or steal it; your jungler can smite without a Flash-steal scare.Control ward
- BRed bot tribushShows the enemy jungler or support leaving their jungle for the pit.Stealth ward
- CRed Blue-buff bushDeep ward in the enemy bot-side jungle entrance: tells you if their jungler is even on this side of the map.Stealth ward
- DRed mid bush (bot-river side)Sees the enemy mid laner leaving lane to rotate down to Dragon. If you see them first, your mid can match.Stealth ward
- EBot river bushKeeps the river covered after the fight so the ADC can push safely.Stealth ward
vision-voidgrubs
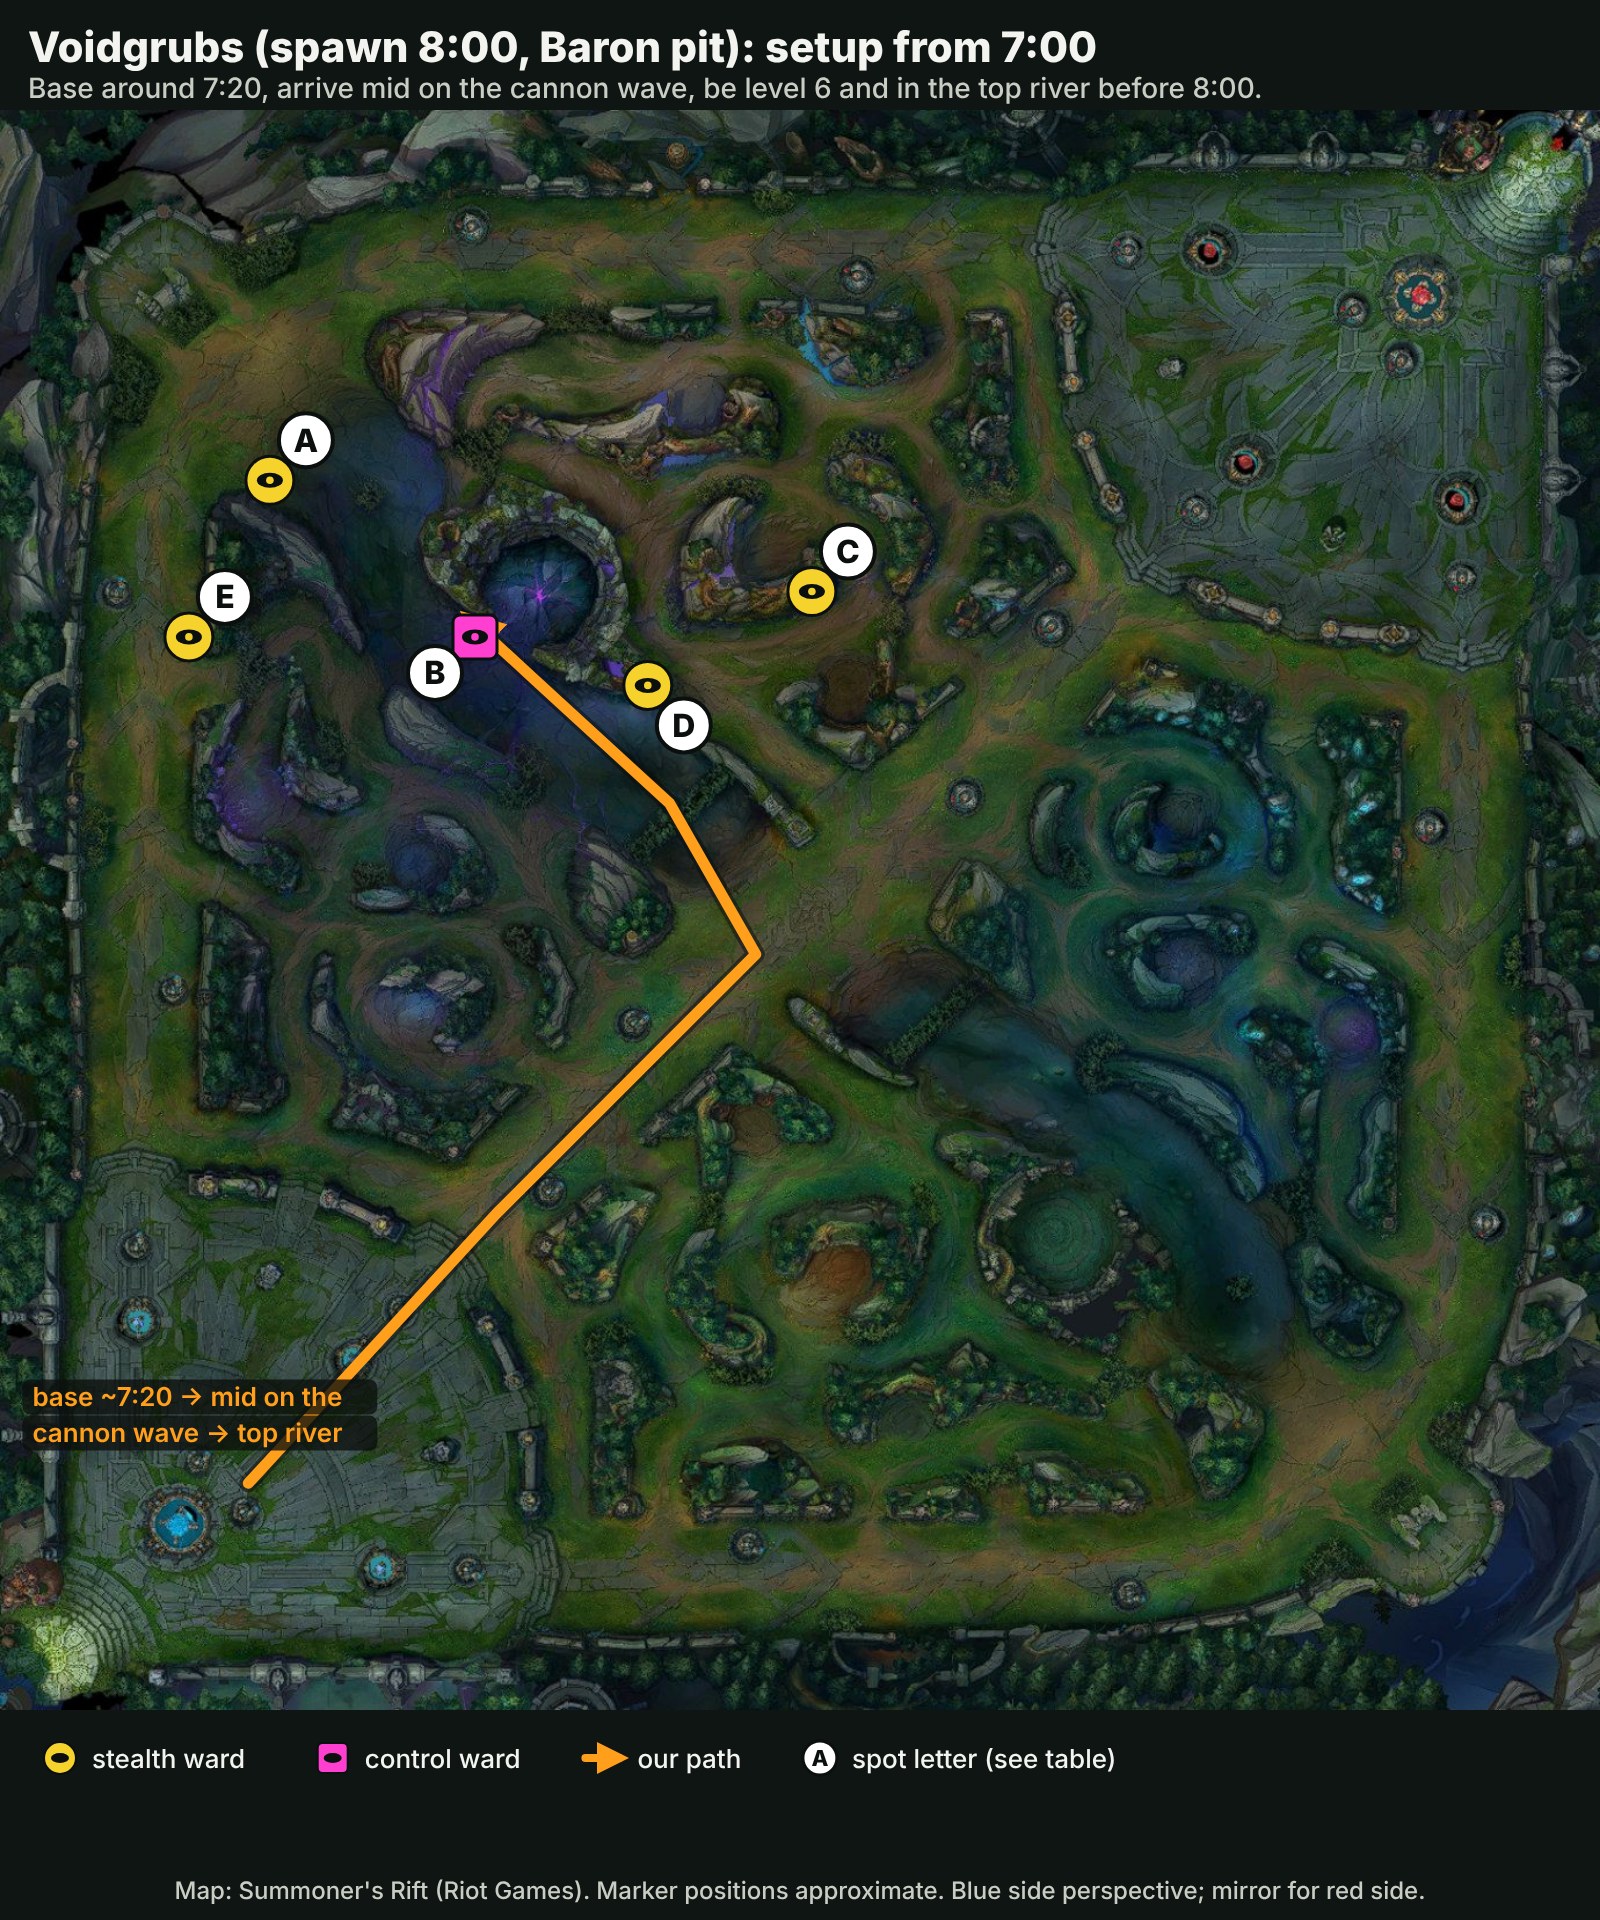
The spots
- ATop river bushSees the enemy top laner and jungler walking down the river to the pit.Stealth ward
- BBaron pit entrance, control wardClears enemy wards at the pit mouth so you can start the grubs without being spotted.Control ward
- CRed Red-buff bushEnemy top-side jungle entrance: shows the enemy jungler arriving from their red buff.Stealth ward
- DRed pixel bushSees the enemy mid laner crossing into the top river to contest.Stealth ward
- EBlue top tribushOur escape route and the path our top laner takes to join. Ward it if the enemy top is ahead.Stealth ward
vision-ahead
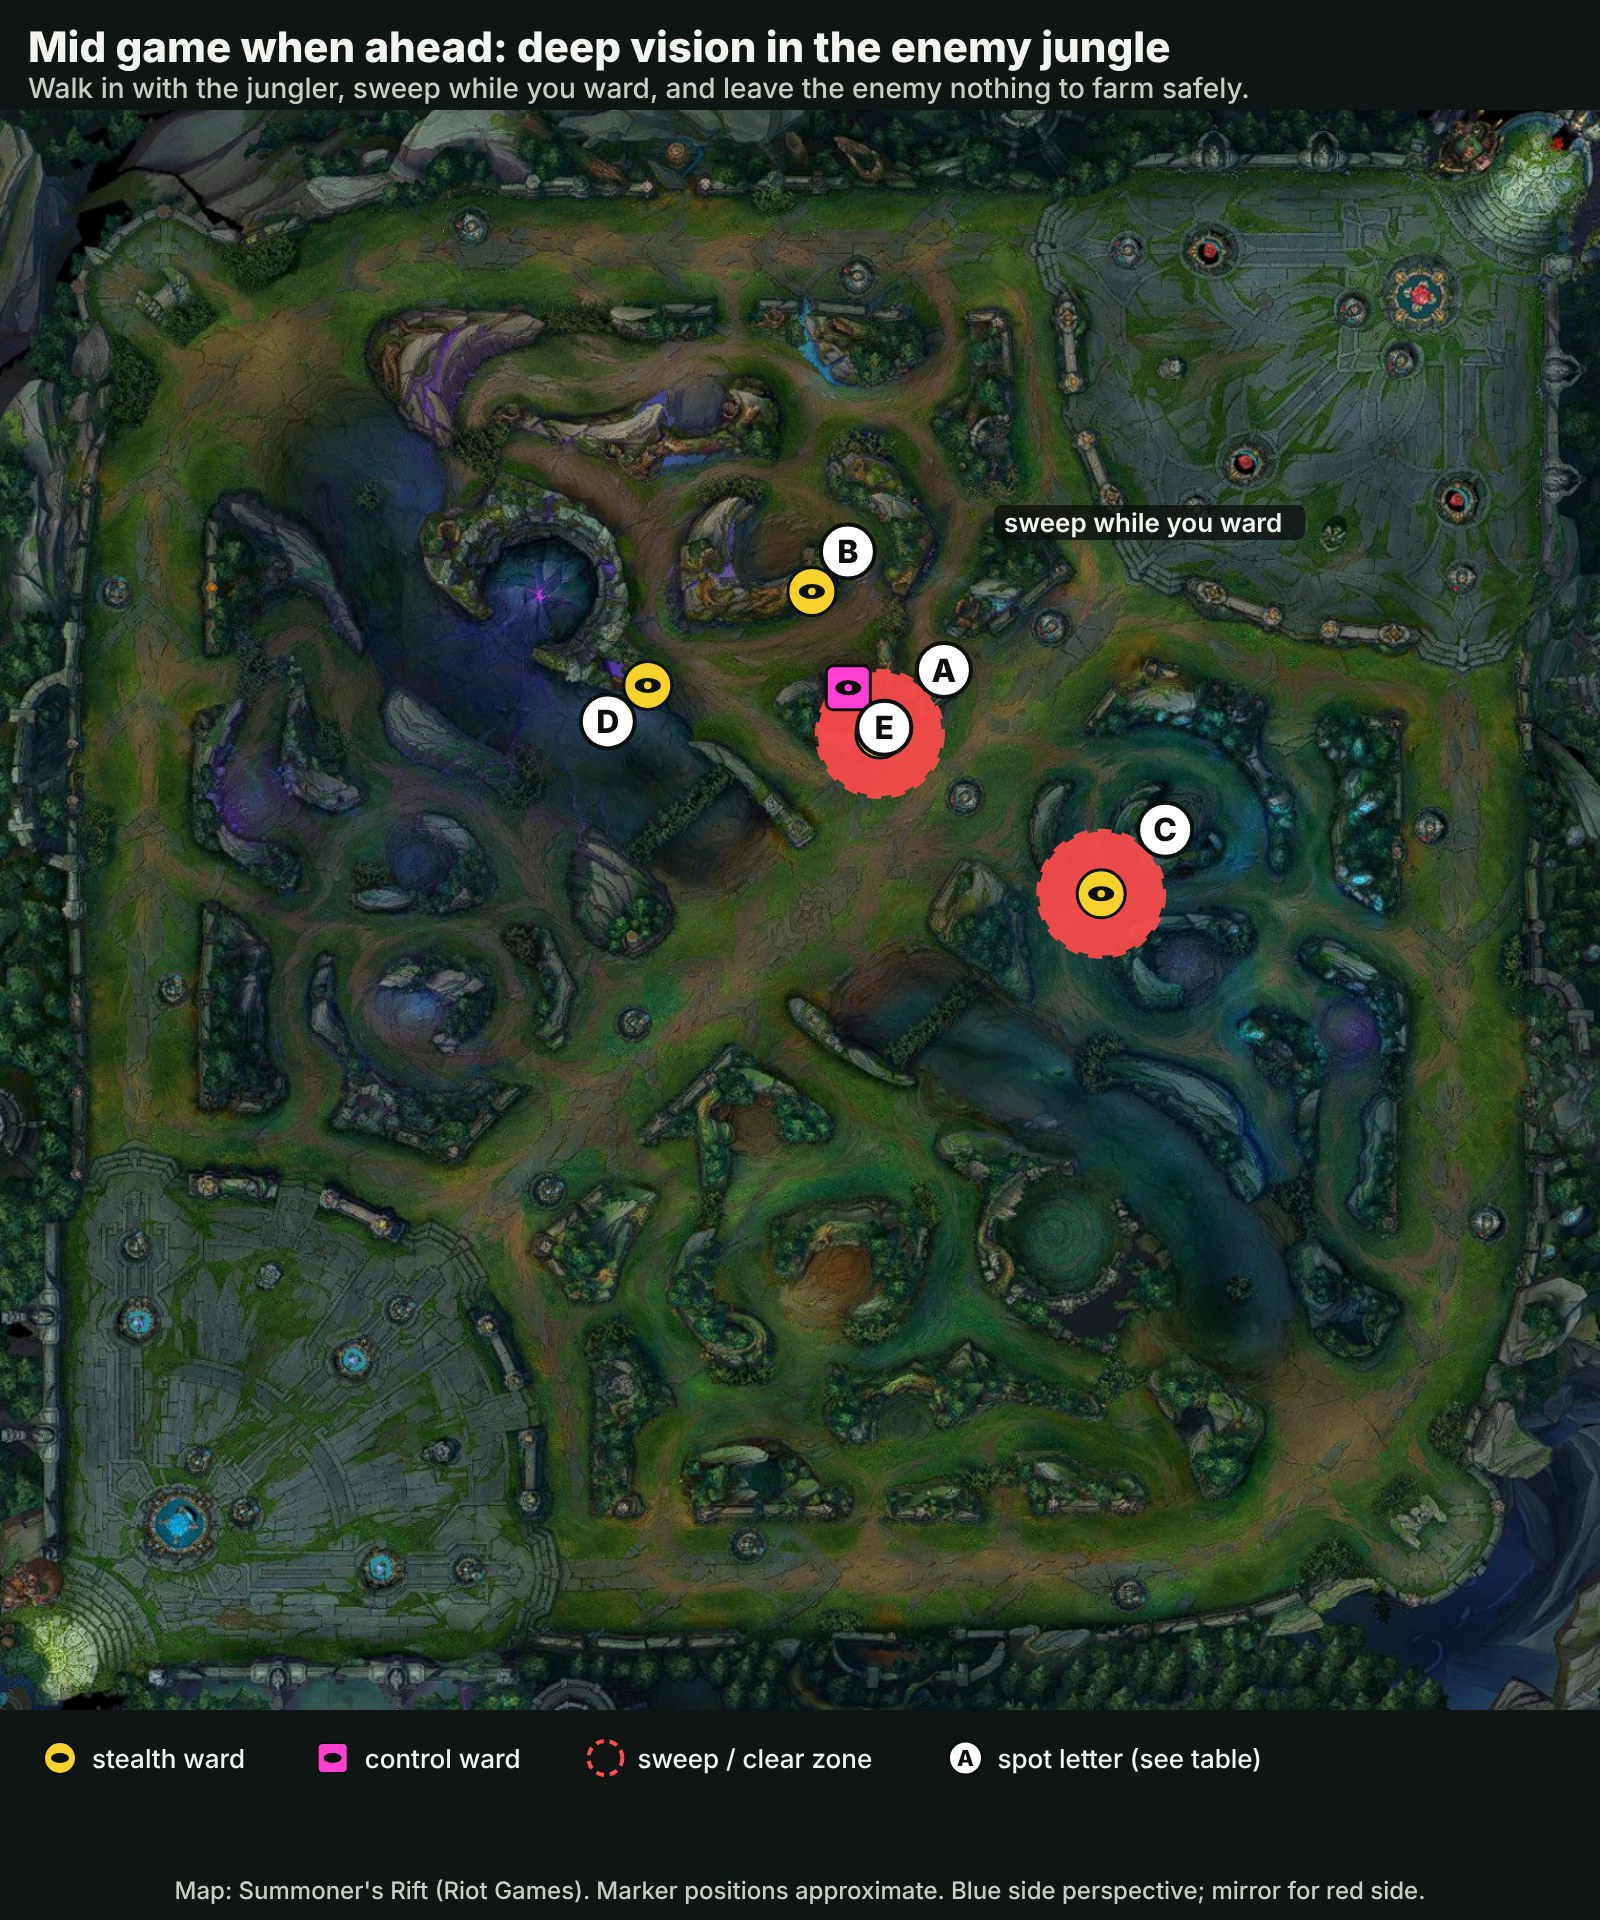
The spots
- ARed Raptors bushCentral enemy-jungle ward: sees the jungler pathing between both sides of their jungle and the mid laner backing off.Stealth ward
- BRed Red-buff bushEnemy top-side entrance: catches rotations toward Baron / Voidgrubs / Herald.Stealth ward
- CRed Blue-buff bushEnemy bot-side entrance: catches rotations toward Dragon and their bot lane.Stealth ward
- DRed pixel bushThe river crossing from the enemy mid lane. Combined with A it shows almost every mid-to-jungle move.Stealth ward
- EControl ward at red RaptorsKeeps the deep wards alive and denies the enemy jungler's own camp vision.Control ward
vision-behind
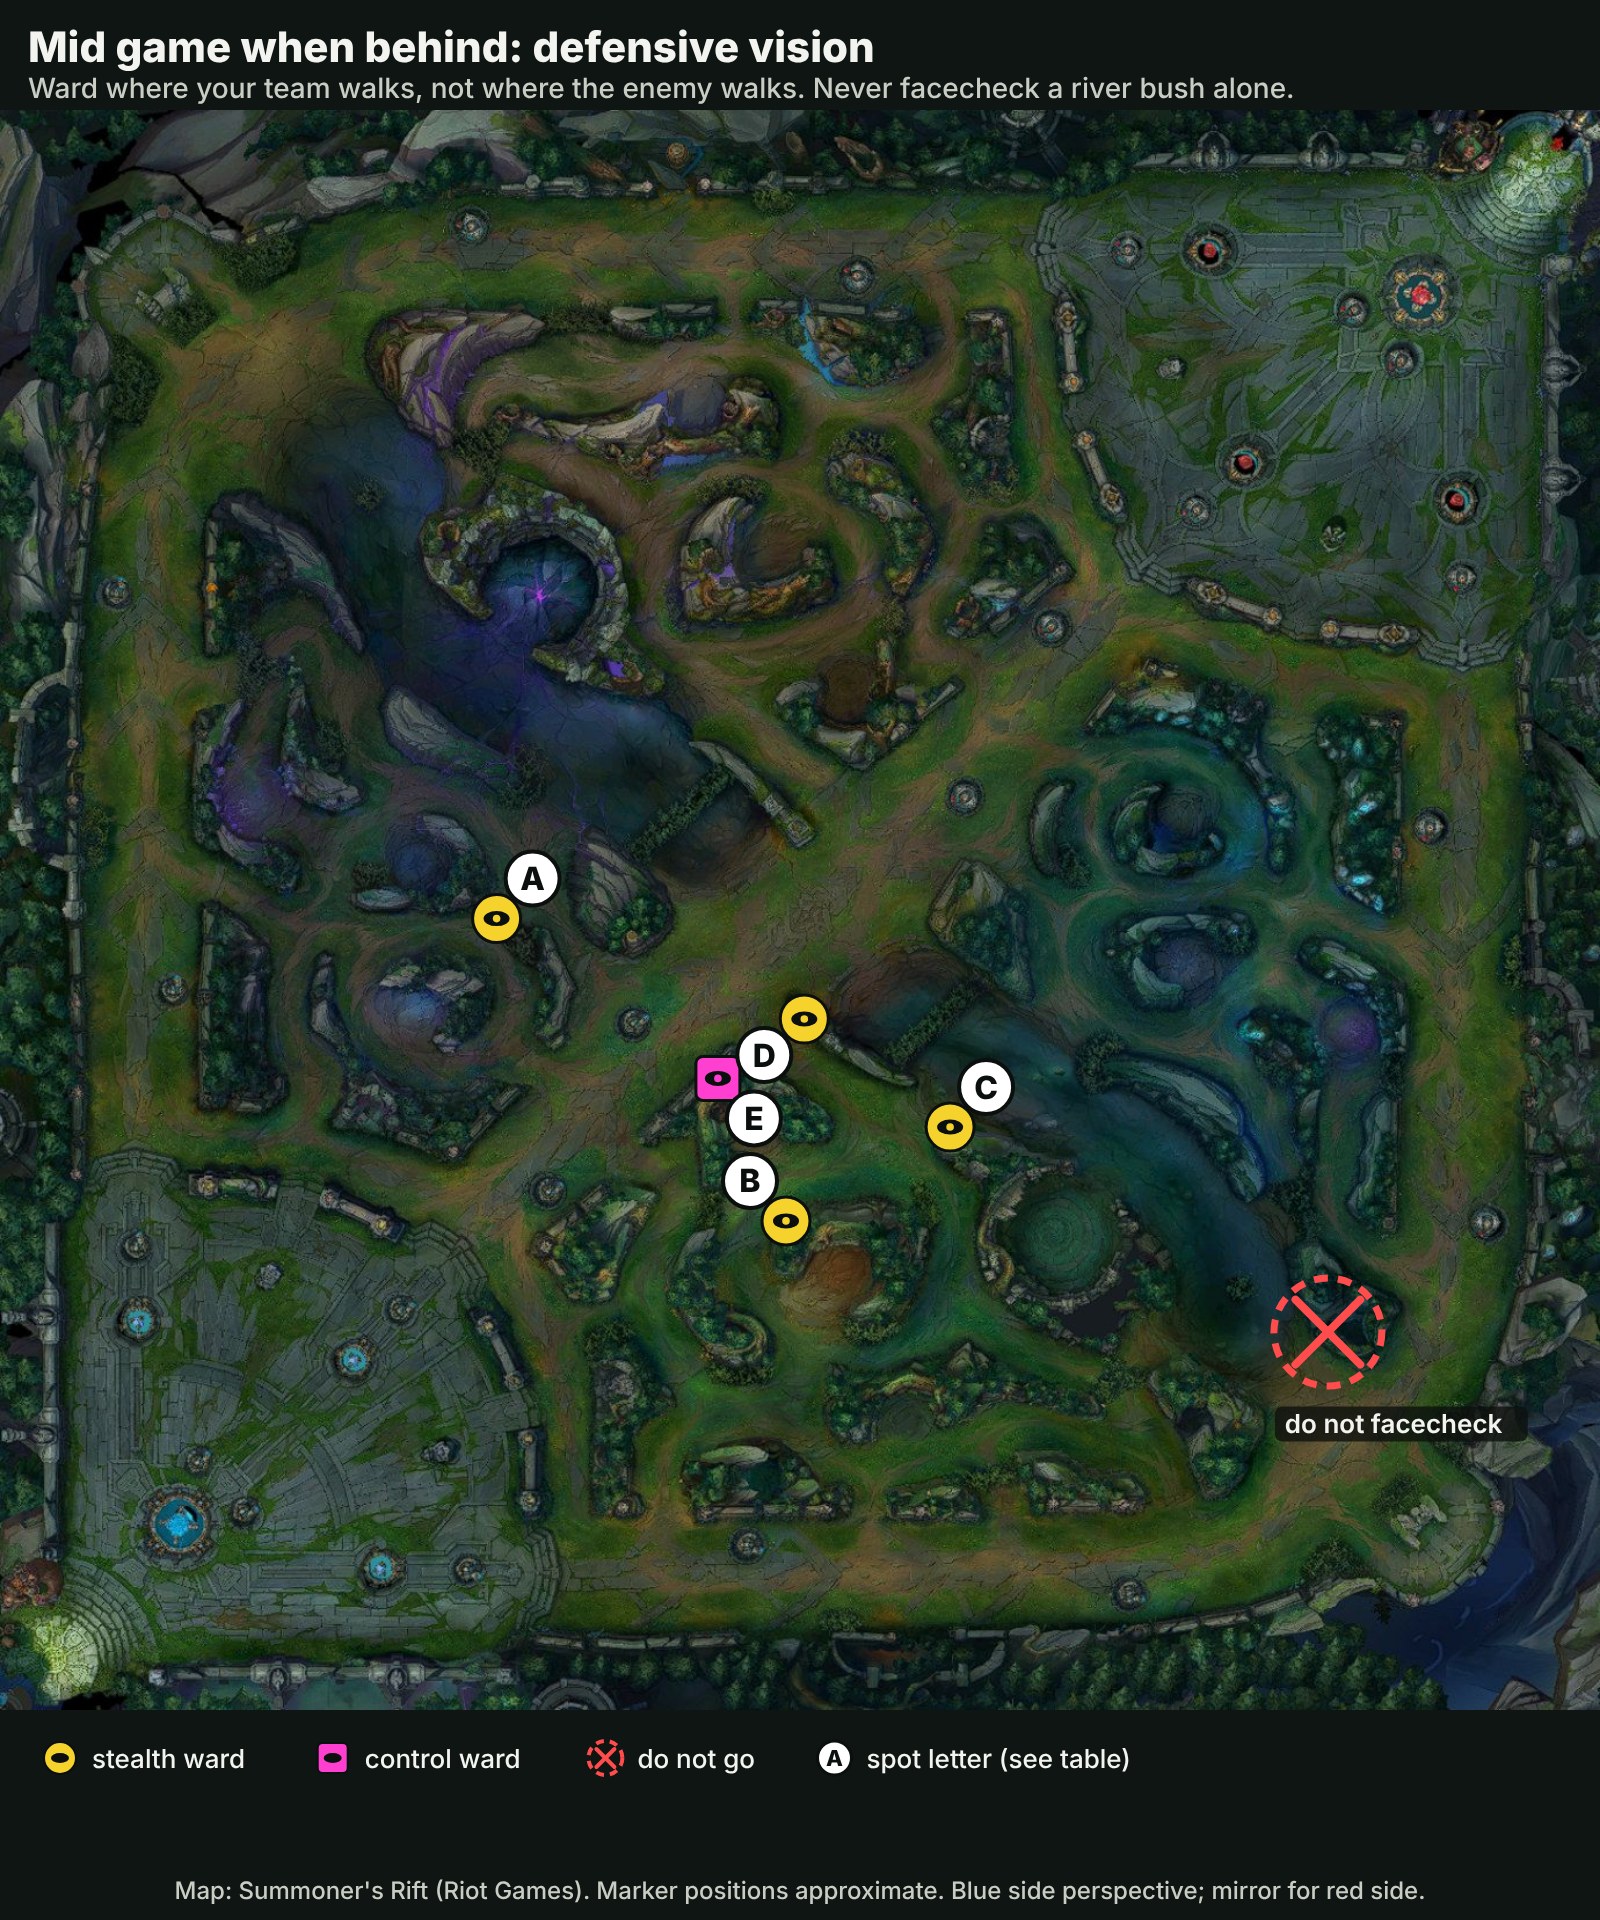
The spots
- ABlue Blue-buff bushProtects your top-side camps and shows invades before they reach the buff.Stealth ward
- BBlue Red-buff bushProtects the bot-side camps and the path to your bot tribush.Stealth ward
- CBlue pixel bushYour side of the river crossing: shows the enemy entering your jungle from mid.Stealth ward
- DBlue mid bush (bot-river side)Lets your mid laner farm under tower without being flanked.Stealth ward
- EControl ward in Blue Raptors bushYour jungler's most contested camp; keeps the defensive net alive.Control ward
- XBot river bush (do not facecheck)When behind, the river belongs to the enemy. Sweep from range or skip it.Do not facecheck
vision-baron
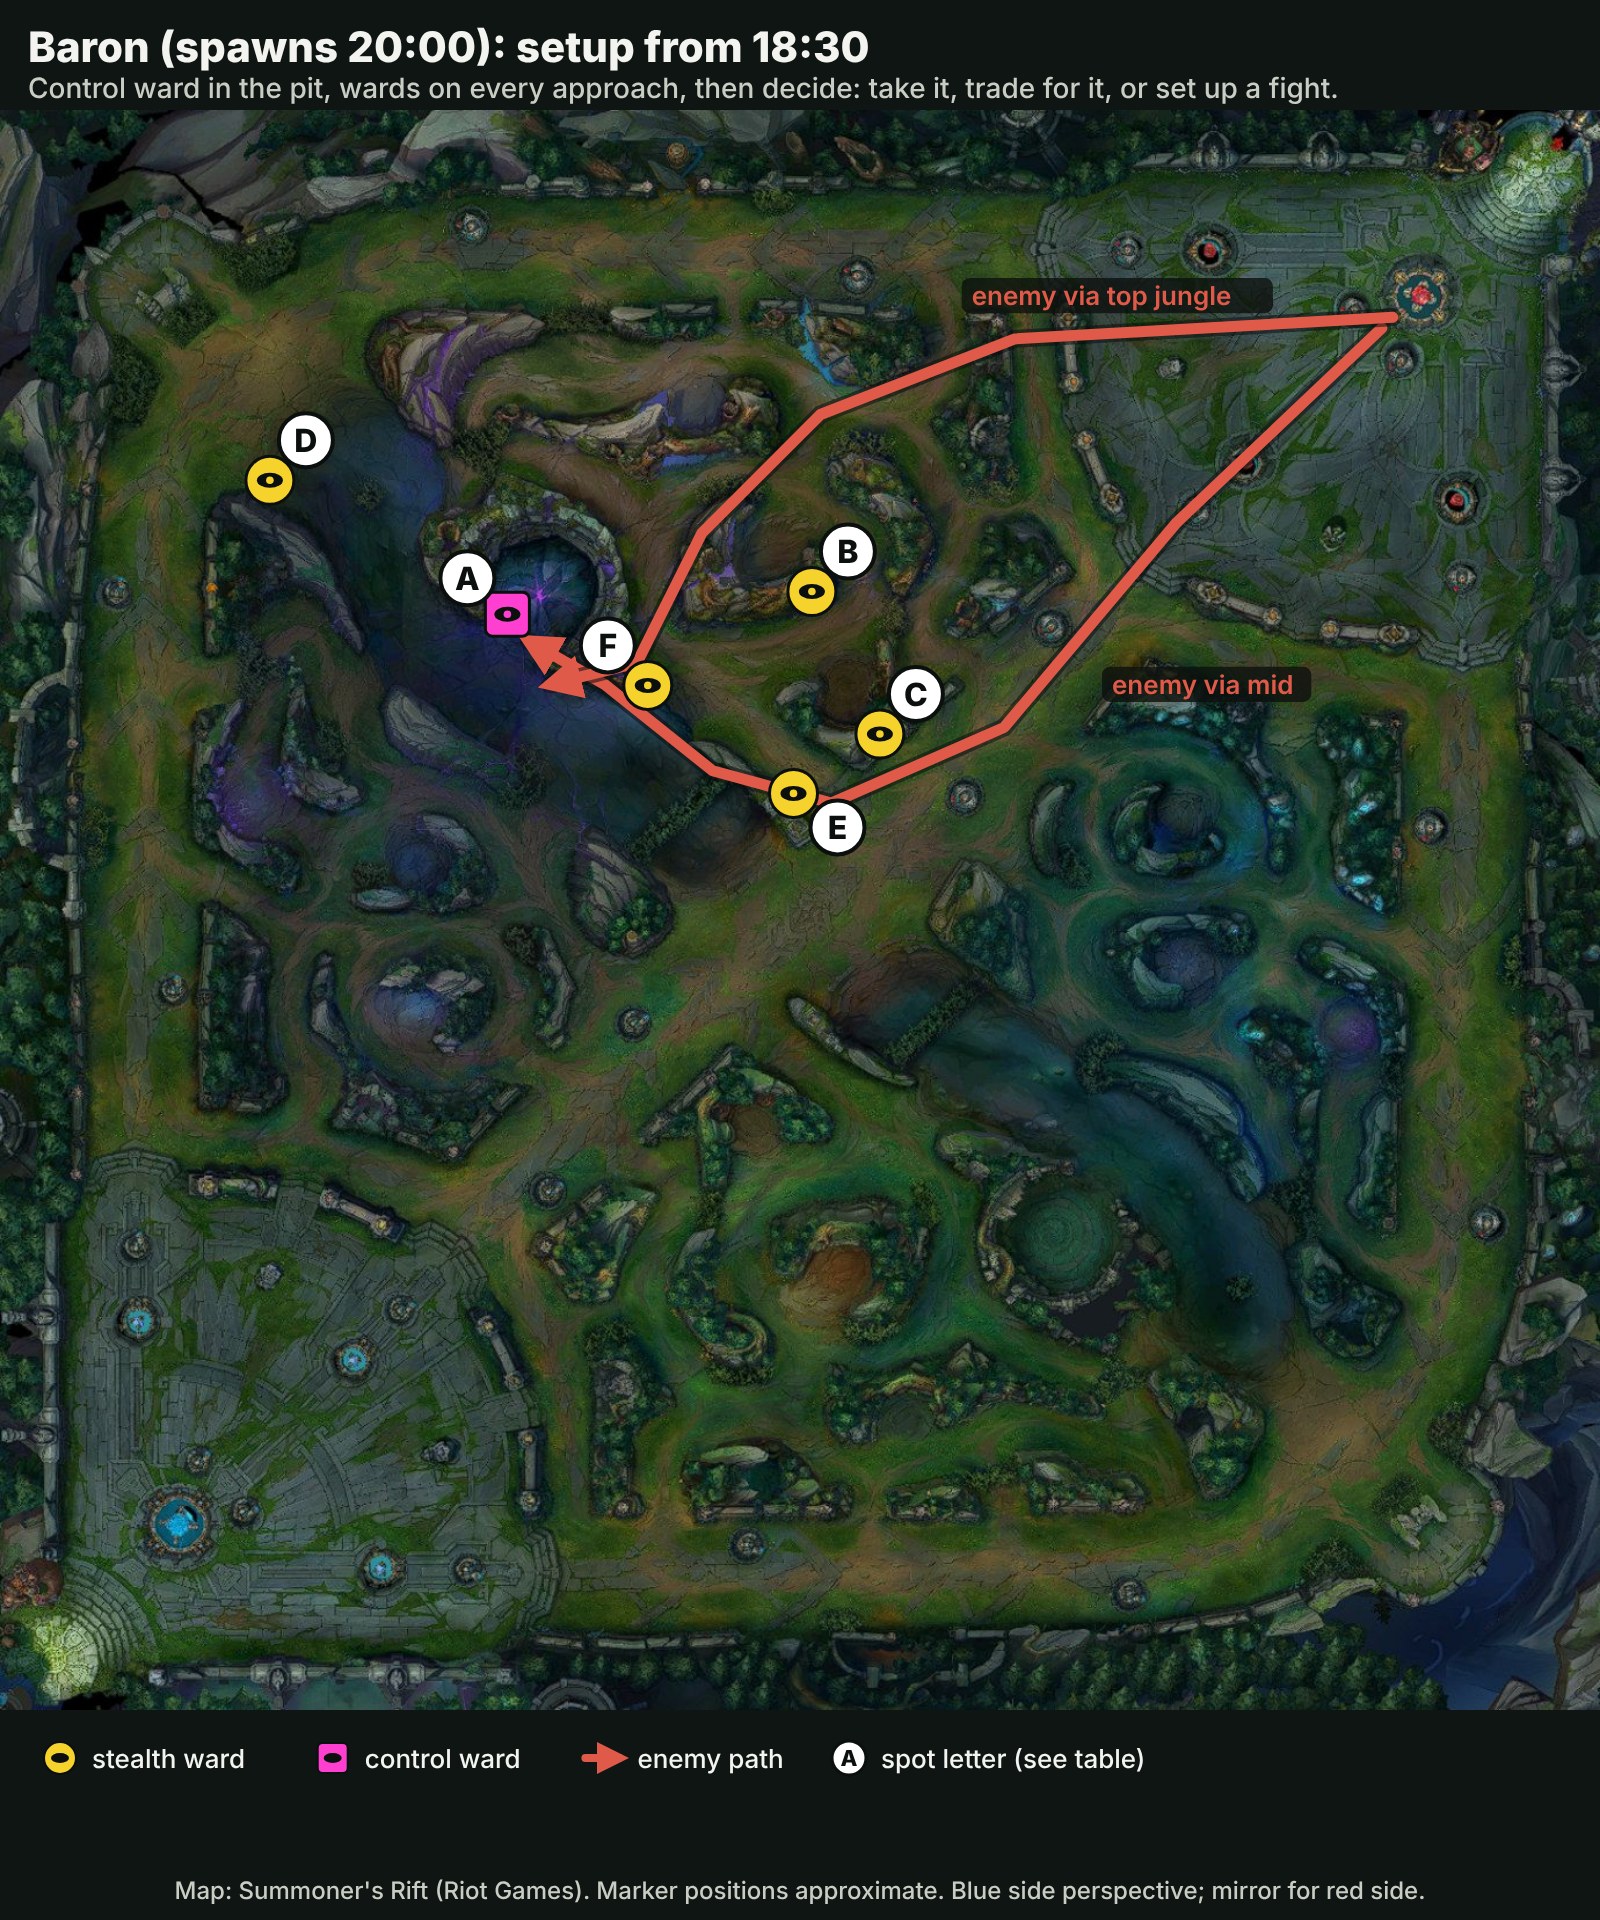
The spots
- ABaron pit (inside), control wardDenies enemy pit vision: they cannot time the Baron, cannot smite-steal with information, and must facecheck.Control ward
- BRed Red-buff bushEnemy top-side jungle: the shortest enemy route to the pit.Stealth ward
- CRed Raptors bushSees the enemy mid laner and jungler cutting through their jungle toward the top river.Stealth ward
- DTop river bushCovers the river approach from the top lane side.Stealth ward
- ERed mid bush (top-river side)Sees the enemy leaving the mid lane for the pit.Stealth ward
- FRed pixel bushThe mid-to-river crossing on the enemy side; the last warning before they arrive.Stealth ward
roam-paths
The spots
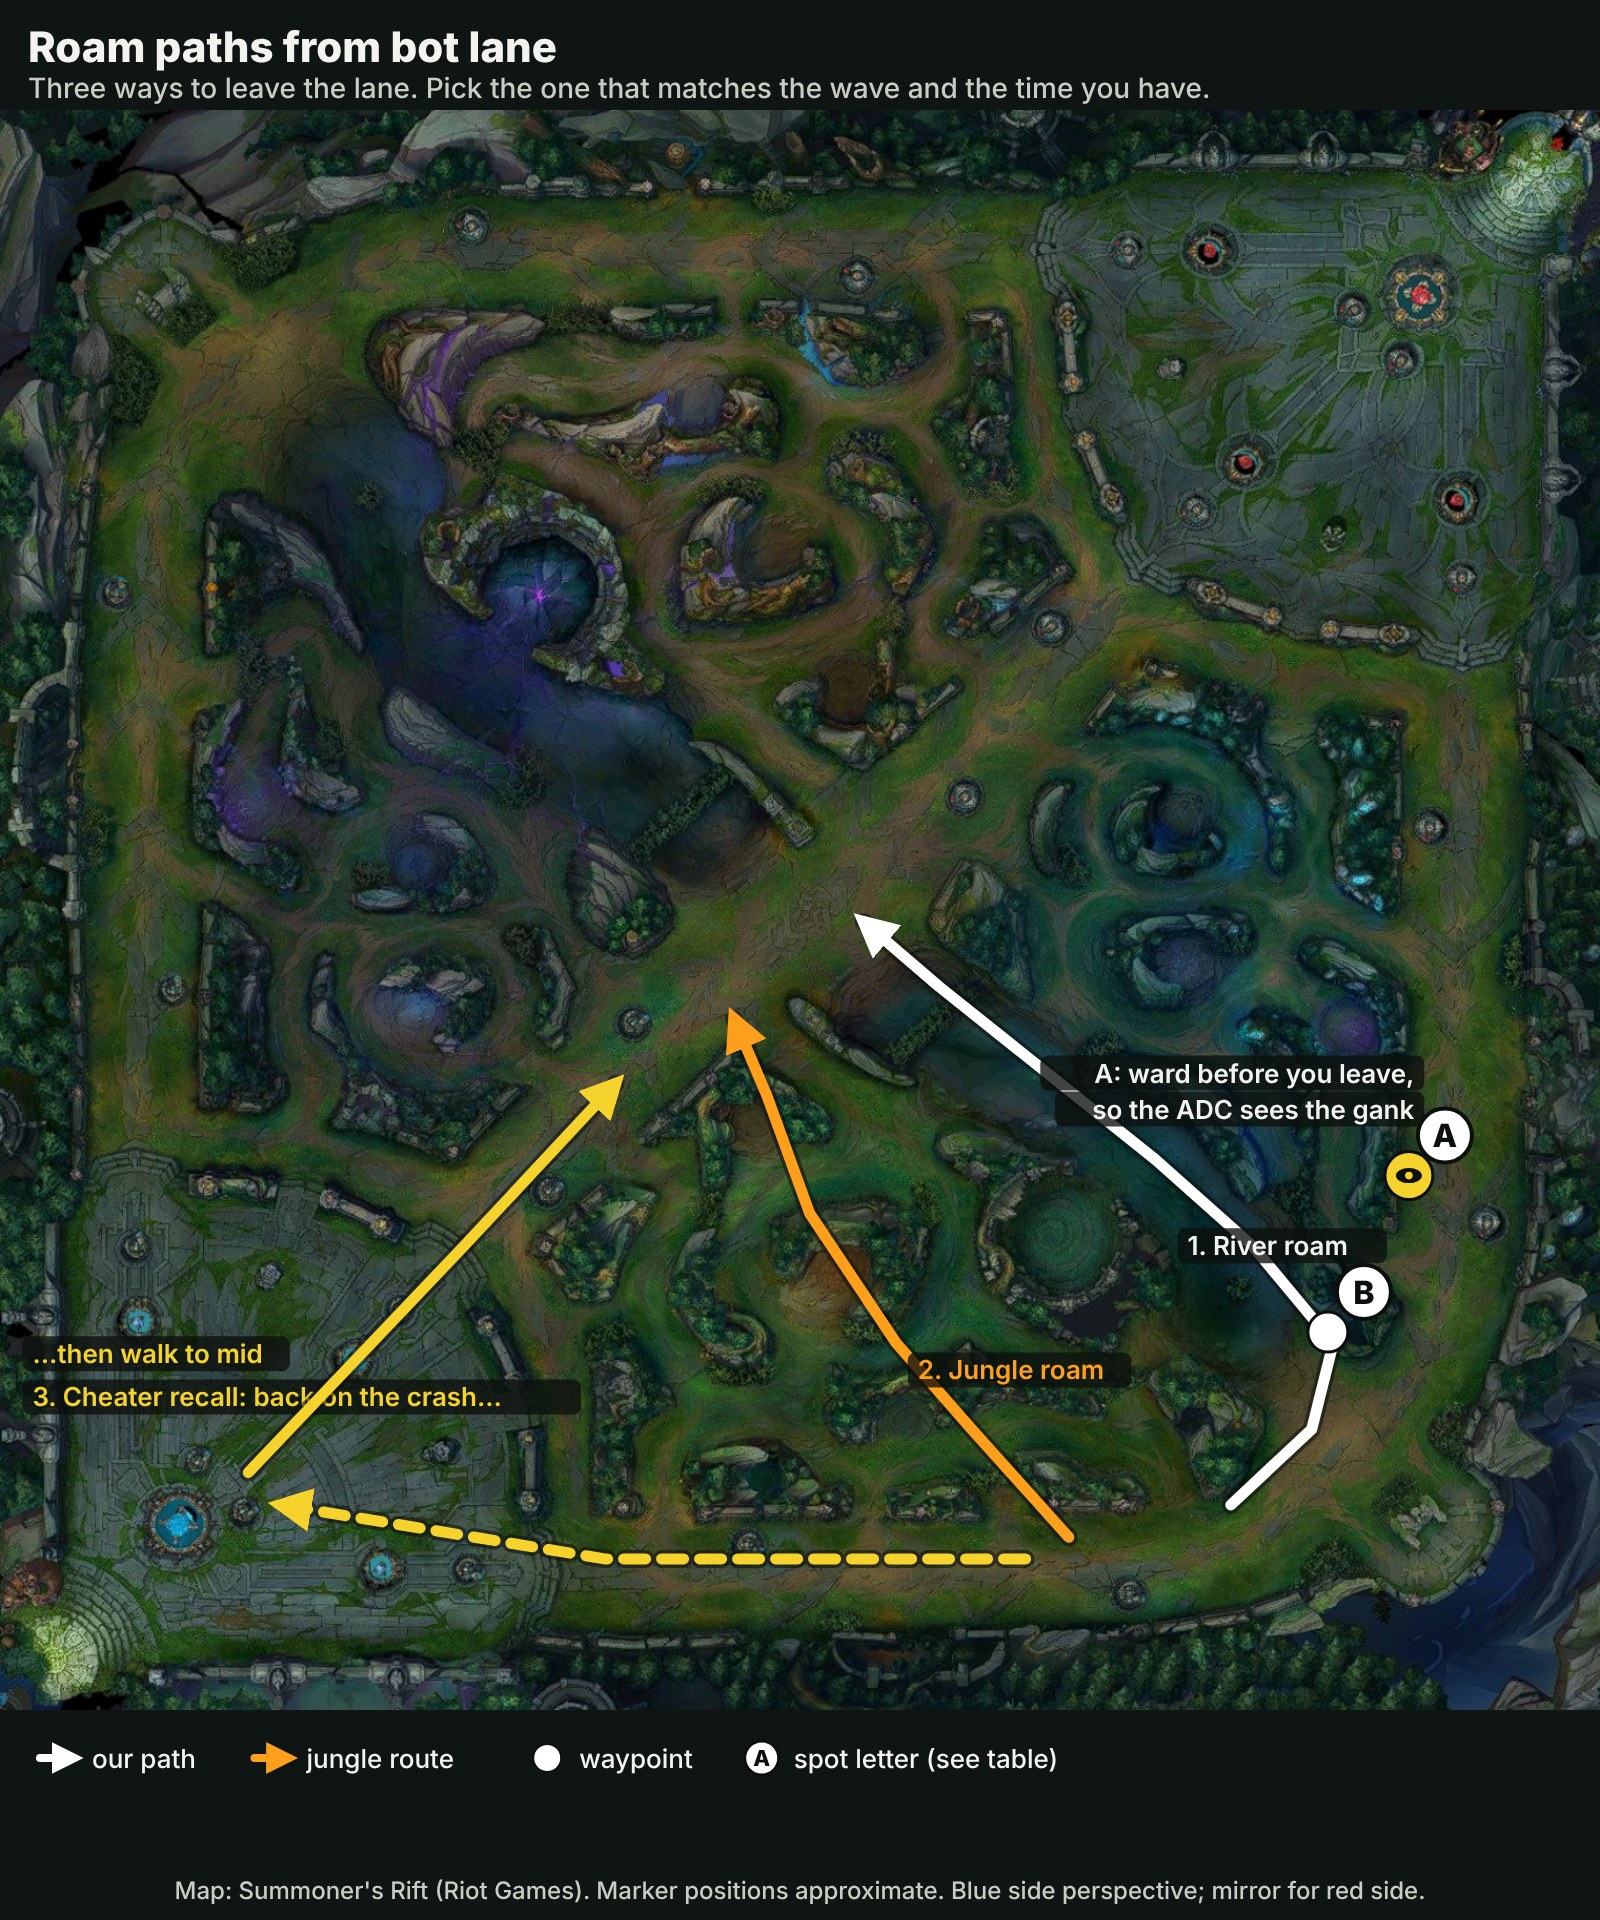
- ARed bot tribush (stealth ward)Place it before you roam: it shows the enemy jungler coming for your solo ADC.Stealth ward
- BBot river bushWaypoint of the river roam. Clear or re-ward it on the way; it is the bush the enemy uses to gank bot while you are gone.Stealth ward
- 1River roamBot lane → bot river bush → Dragon side → mid lane. Fastest to mid, visible to any river ward.Route
- 2Jungle roamBot lane → our Red buff → Raptors → mid lane. Hidden from river wards; good when the enemy has river vision.Route
- 3Cheater recallCrash the wave, recall, buy, then walk to mid from base. You lose nothing if the wave was already crashing into the enemy tower.Route
crossmap-trade
The spots
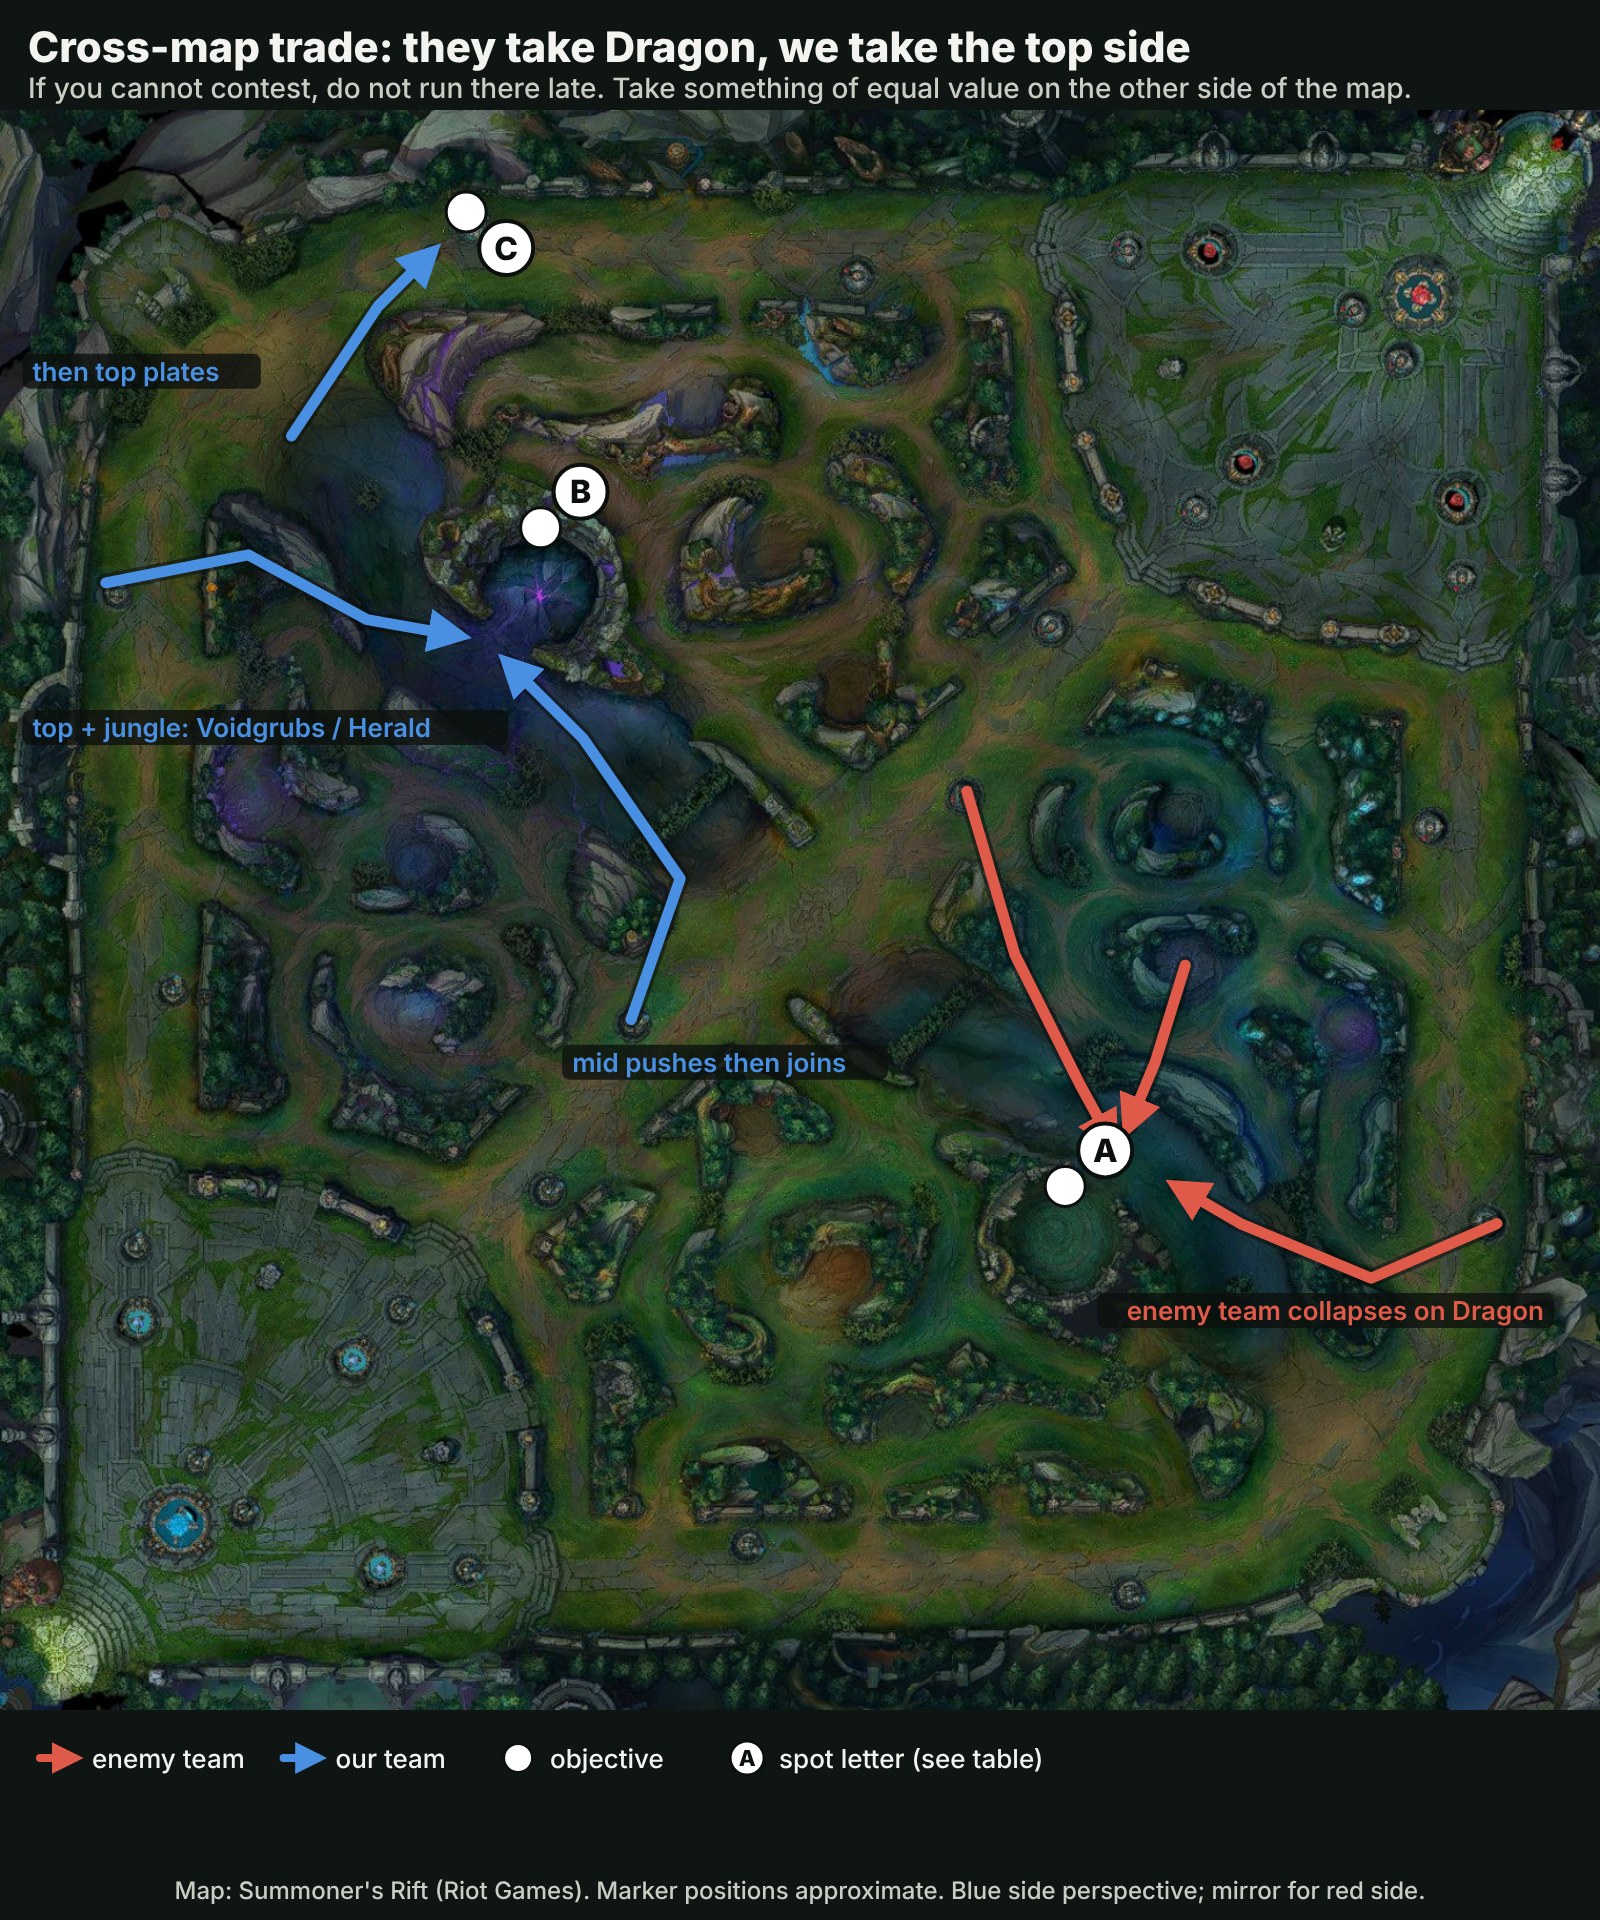
- ADragon pitWhat the enemy is spending 4–5 players and 30+ seconds on.Stealth ward
- BBaron pit (Voidgrubs before 14:45, Rift Herald 15:00–19:45)The top-side objective your team takes while they are busy.Stealth ward
- CRed top T1 (plates)Extra value on the same side: plates before 14:00, or the tower itself with Herald.Stealth ward